Toys are a great way to help young ones learn numbers and colors while enhancing motor skills. Making toys can be just as enjoyably educational for parents as well!
Simple Toys
When choosing toy designs, usually the easiest to build with the fewest mechanical linkages will last many generations. Simple Toys that have stood the test of time are usually sturdy wooden creations that are easily replicated:
- Animated pull toys
- Trains and tracks
- Building blocks
Choosing which wood to use is important for durability, and you can save time by purchasing common items like wheels and blocks instead of trying to cut them yourself. The following toys are only guidelines to let you and your child's imagination create the unexpected, but help to use the attached printables is available.
Wooden Puzzle
Wooden puzzles allow for hours of play that encourage logical thinking and shape, color, and pattern recognition. This puzzle uses one of your own photos, so it's easy to customize it. The trick to cutting this simple geometric puzzle is to use a very thin blade so you can make the sharp turns necessary for a tight puzzle fit. You will still have some play between pieces, but it won't be too noticeable. The printable includes plans, instructions, and materials lists.
Materials
- 1 Sheet 5mm poplar plywood cut to 8 inches by 10 inches
- 1 8 oz. jar matte gel medium
- 1 home-printed photo of your choice cut to 8 inches by 10 inches
- 80 grit sandpaper
- Bristle paintbrush
- Foam paintbrush
- Clean white rags
- 00 grade steel wool
Tools
- Coping saw with blade
- Orbital sander
- X-acto knife
Procedure
- Transfer the attached printable to the wood and cut with a coping saw. Sand the front and the back with the sander.
- Sand interlocking areas by hand. Clean all pieces with a bristle brush to remove dust.
- Interlock all pieces and apply a thick layer of gel with the foam brush.
- Press the photo onto the gel surface picture-side down. Gently smooth out bubbles.
- Lay a large cutting board over the entire surface and press evenly. Remove the board.
- Let set for 24 hours. Soak rags in water, wring, and place them over the photo until the image shows through the wet paper.
- Rub the photo with the rag to remove the paper leaving the image on the wood. Buff with the steel wool to polish.
- Use a knife to separate pieces if necessary. Enjoy!
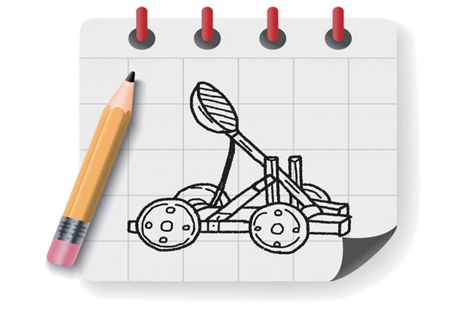
Rubber Band Trebuchet
Who doesn't love a catapult? Kids love to fling stuff across the room, but it's good to have a governor on what can be thrown. A simple rubber band can limit what this mighty beast will throw without losing some of the thrill. Download the attached printable for a supply list, step-by-step instructions, and plans.
Materials
- 2 wood blocks 5 ½" x 2 ½" x 1" (D, E)
- 3 wood dowels 3/16" x 2 ½" (A, B, C)
- 1 balsa plank ¾" x ½" x 7" (F)
- 1 8-32 x 5" bolt
- 1 8-32 nut
- 8 #8 washers
- 1 #4 screw eye hook
- 1 plastic egg shell
- 1 orthodontic rubber band
- Super glue
Tools
- Drill with bits
- Wrenches
- Rotary tool with bits
- Clamps
Procedure
- Drill holes A and B halfway through block D, one inch from the front edge
- Drill hole C halfway through block D, one inch from rear edge.
- Repeat steps 1 and 2 for block E making sure to mirror Block D for dowel insertion.
- Square blocks D and E with the dowel holes facing each other and clamp the blocks. Drill a hole for the bolt through the center of blocks D and E.
- Drill a hole in plank F one inch from the end. Screw the eye hook into front of plank F nearest the hole. F A C B PLASTIC EGG PIECE FRONT DOWELS
- Press dowels ABC into holes of block D and E to form the outer cage of the catapult.
- Align the center hole in blocks DE with the hole in plank F and push the bolt through adding washers to center plank F. Attach a nut to the bolt and tighten. Ensure plank F moves freely.
- Trim the bottom half of the egg shell with the rotary tool to form a cup. Glue the shell to the top rear of plank F.
- Thread the rubber band through the eye hook and bottom dowel. Launch offensive!
The rubber band should never be slack throughout the entire movement of the arm, and ammunition should not be overly heavy. Use items such as popcorn, tape balls, packing peanuts, etc. Using lightweight wood for the throwing arm lets you put somewhat heavier items in the basket, but the rubber band will prohibit children from causing too much damage while playing on their own.
More Challenging Toys
The simple toys above can be made in a day or two but if you want to test your skills, there are some great free ideas out there that will wow your kids and neighbors.
- This pictorial instruction for a rideable crane can keep children busy for hours, and the combination of wooden and mechanical elements make for a fun build, as well.
- Allcrafts has full plans and instructions for almost any toy or craft imaginable, and it's all free. Some of their woodworking plans are scanned from original documents, while others are made by people just like you. While it's fun to imagine building some of these creations on your own, it's more fun to pull a child on your lap and browse the possibilities.
Fun With Tools
Purchased with good intentions, the results of either inexperience or unsuccessful endeavors may have prematurely sentenced good tools to the shelf. Practice, and good blades, makes for more successful cuts, so make sure you get a lot of both and don't be afraid to sacrifice one awkward project for a beautiful second.
While the work may seem to be extensive with do-it-yourself projects like these when buying one off the shelf is inexpensive, it is the interaction with your child of choosing, building, and playing that will reward both parties. The example you set will last generations as your children teach their children to explore the possibilities of bringing their own imaginative toys to life.
Building Family Ties
A simple wooden toy built with child and parent interaction helps increase the familial bond. Toys encourage a learning environment while creating a simple playtime activity that the child can learn to accomplish themselves and creating the toys with your children can be very fulfilling. The fun of watching a child's confidence grow as they master the toy crafted within the home is just as fun as making the toys themselves.
